


Date:2017-10-18 Hits:4709
TECHNICAL SPECIFICATIONS
Supply Voltage: BP110UV 110 VAC (+20%, -15%) 50/60HzBP230UV 230 VAC (+10%, -15%) 50/60Hz
Power Consumption: 7 VA
Temperature Rating: Operating -40°C to +60°C (-40°F to 140°F)
Storage -50°C to +85°C (-58°F to 185°F)
Protection Category: IP40 (except wiring base)
Dimensions:
Control Unit: 4.0” (102mm) L x 4.0” (102mm) W x 4.4” (112mm) H
(without base)
4.15” (105mm) L x 4.15” (105mm) W x 5.0” (127mm) H
(with base)
Weight: 2.5 lbs (1.13kg)
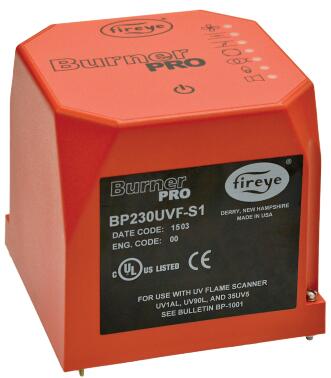
The BurnerPRO provides the proper burner sequencing, ignition and continuous flame
monitoring for commercial heating and process equipment firing oil and gas fuels. The system
is designed for use in non-permanent operations that requires burner recycle at least once
every 24 hours. Seven SMART LEDs provide current operating status and lockout information
in the event of a safety shutdown.
BurnerPRO BP110UV-S1, S2,, S3 and BP230UV-S1, S2, S3 controls are plug and play compatible
with select Siemens LFL control models. Use existing wiring base with no external wiring changes. The
controls are also compatible with Satronic TMG controls with minor wiring changes. See the reverse
side for compatability listings.
REPLACING EXISTING SIEMENS LFL BURNER CONTROL
BurnerPRO is functionally compatible with the following LFL models:
LFL BURNERPRO
LFL1.322 BP230UV-S1
LFL1.322-110V BP110UV-S1
LFL1.333 BP230UV-S2
LFL1.333-110V BP110UV-S2
LFL1.335 BP230UV-S3
LFL1.335-110V BP110UV-S3
Replacing an existing LFL is quite simple by following this procedure:
1. Identify/Order the equivalent BurnerPRO version for replacement.
2. Identify/Order the BurnerPRO scanner that fits the environment (UV90L-1
or UV1AL-3/6). (Fig 1)
3. Remove the LFL control from its wiring base. Install the grounding tab to
the LFL wiring base provided in the shipping box. (Fig 2, Note 1)
4. Remove Earth ground wire/reference to terminal 22. BurnerPRO will drive
the S1 & S2 signals to the UV scanner. (Fig 2, Note 2)
5. Install the BurnerPRO control.
6. On the main burner, locate the existing UV scanner and replace with the
BurnerPRO scanner.
REPLACING EXISTING SATRONIC TMG BURNER CONTROL
BurnerPRO is functionally compatible with the following TMG models:
TMG BURNERPRO
TMG 740-1/2/3 model 32-32 BP230UVF-S2
TMG 740-1/2/3 model 45-54 BP230UVF-S3
Replacing an existing TMG can be accomplished by following this procedure:
1. Identify/Order the equivalent BurnerPRO version for replacement
2. Identify/Order the BurnerPRO scanner that fits the environment (UV90L-1
or UV1AL-3/6).
3. Order the Fireye wiring base 60-2944-1.(Fig 3)
4. In the control cabinet, remove the TMG control and wiring base.
5. Install the Fireye wiring base and attach the wires as recommended by
the Fireye technical bulletin. Make sure a solid ground connection
is provided to the base.
6. Install the BurnerPRO control.
7. On the main burner, locate the existing UV scanner and replace with the
BurnerPRO scanner.
Fig 1. UV Scanners
Fig 2. LFL Wiring Base w/ground tab
Fig 3. Fireye Wiring Base
 Salesman-1